In the previous post, I said I was still deciding what motor I wanted. I wanted a QS hub motor, laced with spokes to a 16" rim. Their website indicated that the 4kw hub motor could not be laced to a 16" rim, yet the 3kw hub motor could. I did the math and the 3kw motor would not be fast enough.
But I made an inquiry with the company and they said they *could* make a 4kw hub motor for a 16" spoked rim after all. So I ordered it, along with the matching Kelly controller (KLS7245N), disc brake kit, and twist throttle.
While that was being shipping, I got busy with the body work. I first stripped off all the paint with a paint-stripping disc on an angle grinder, worked great.
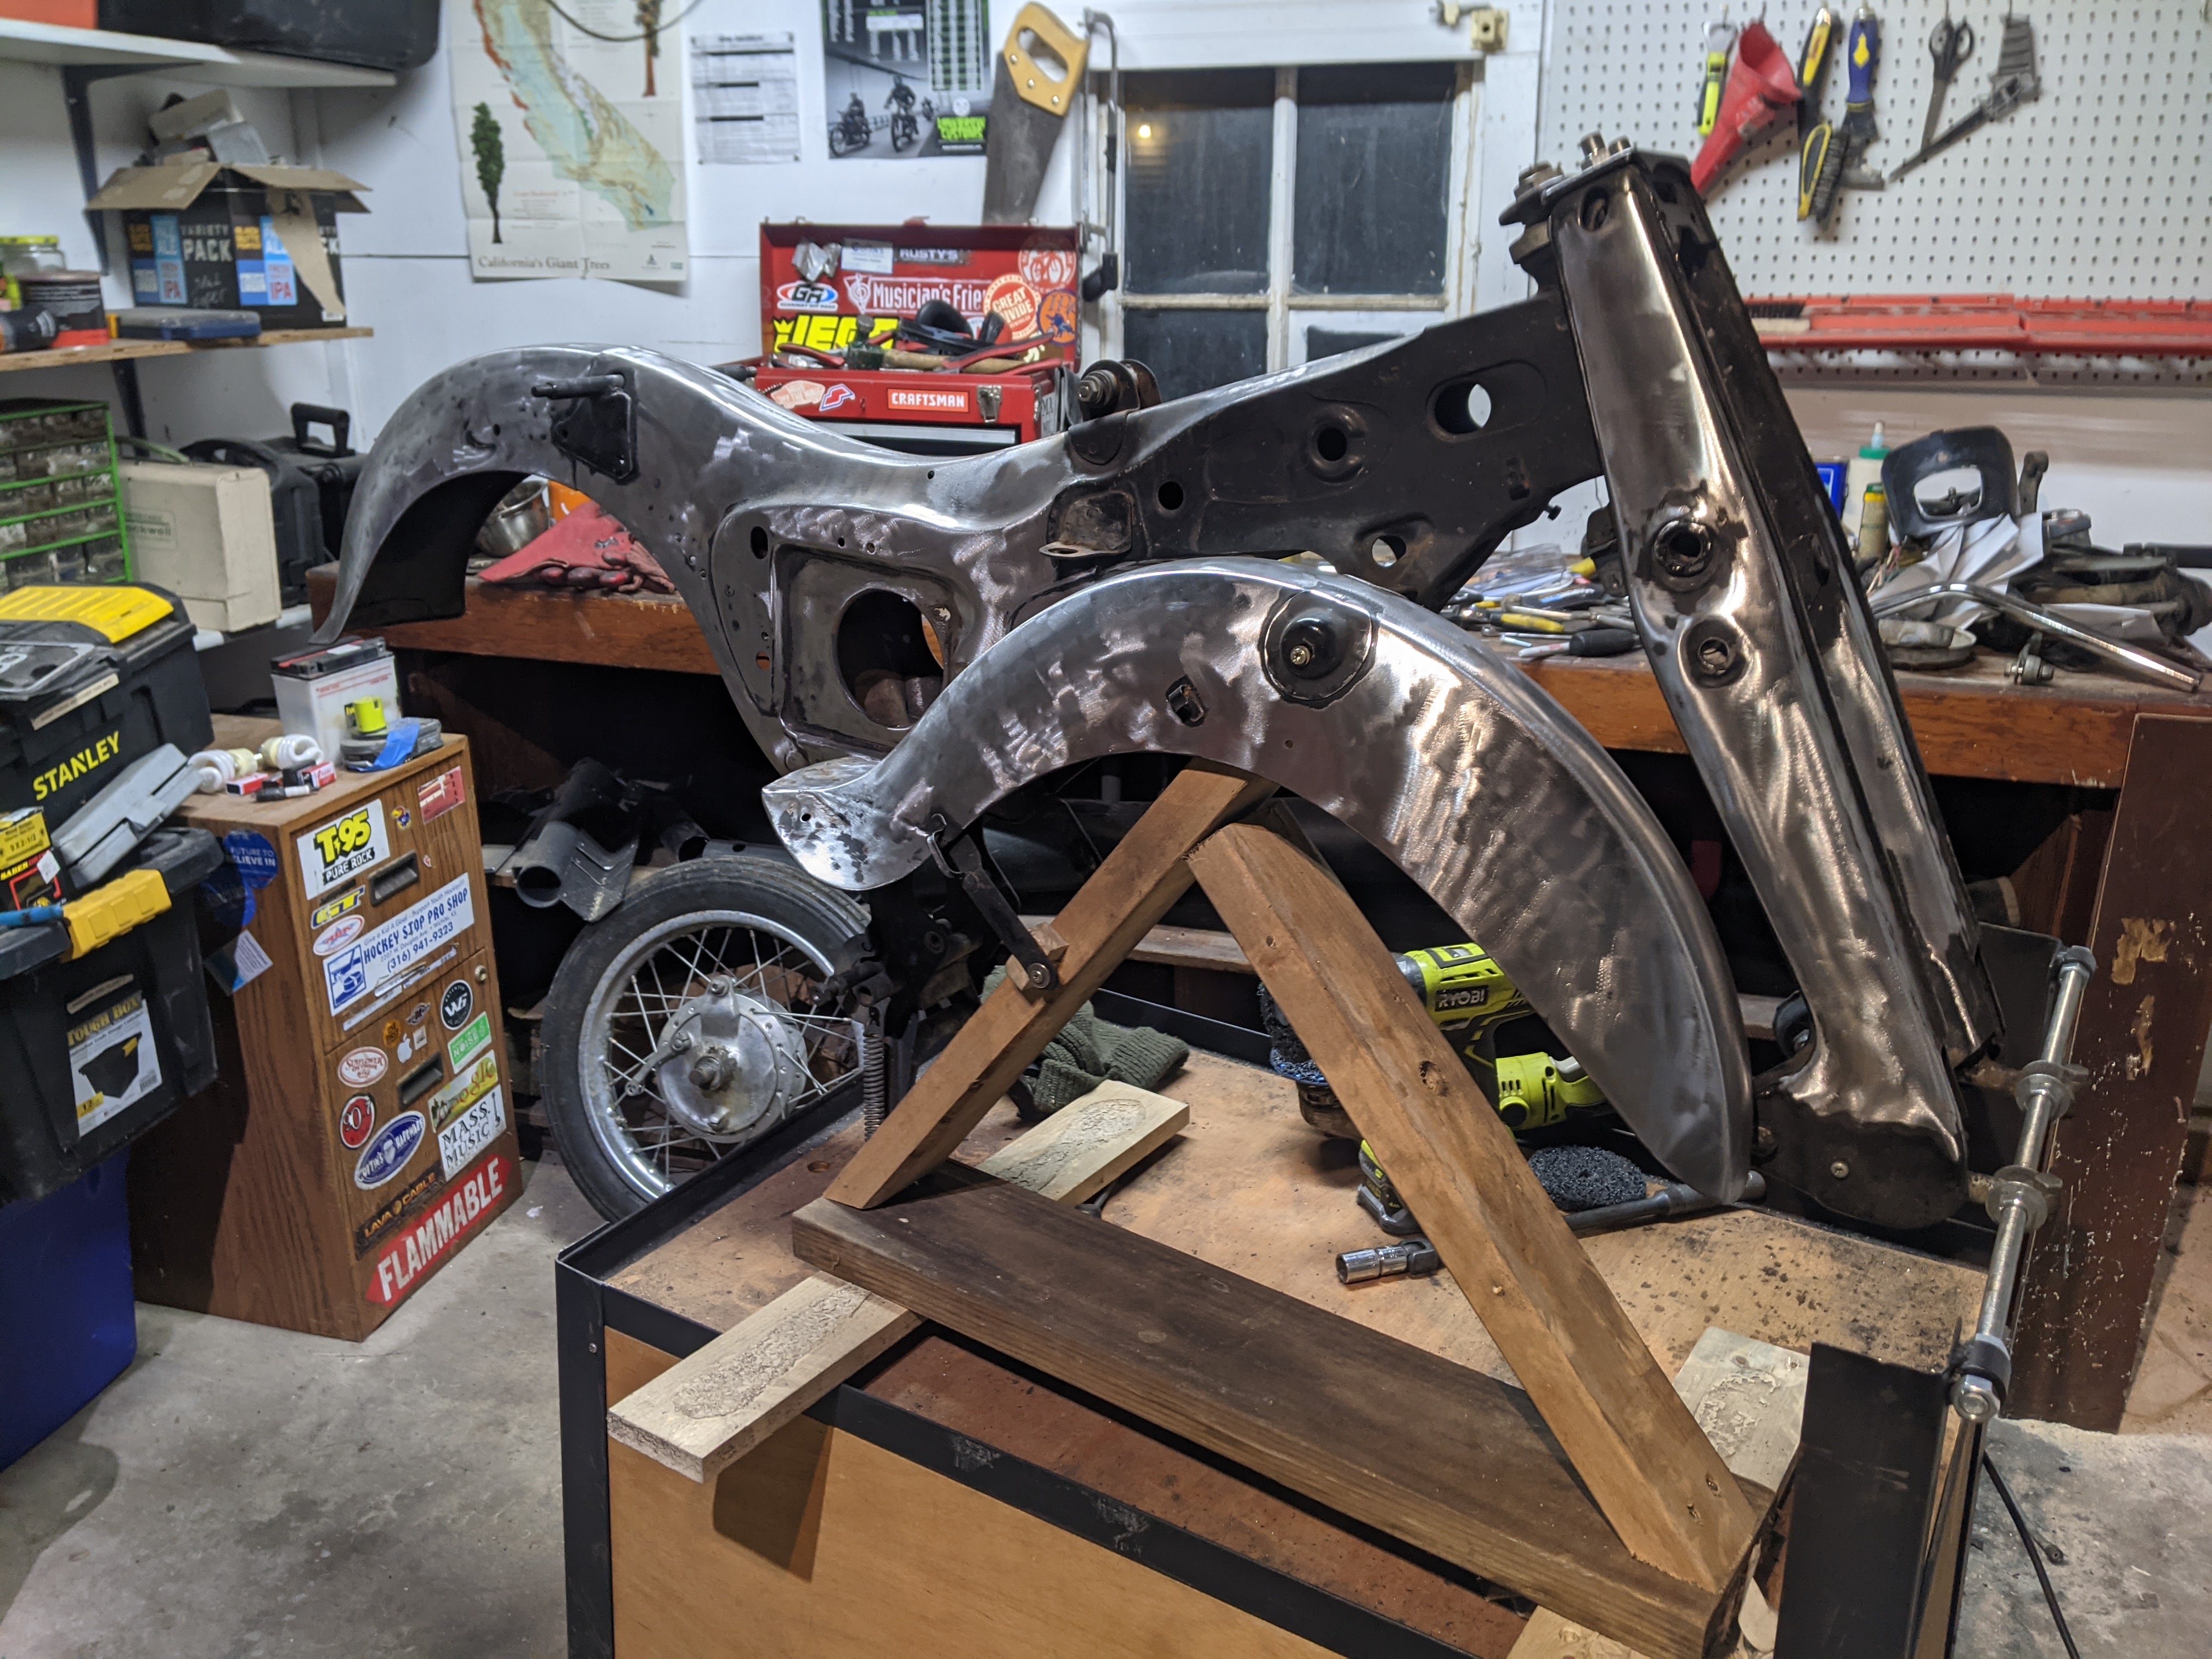
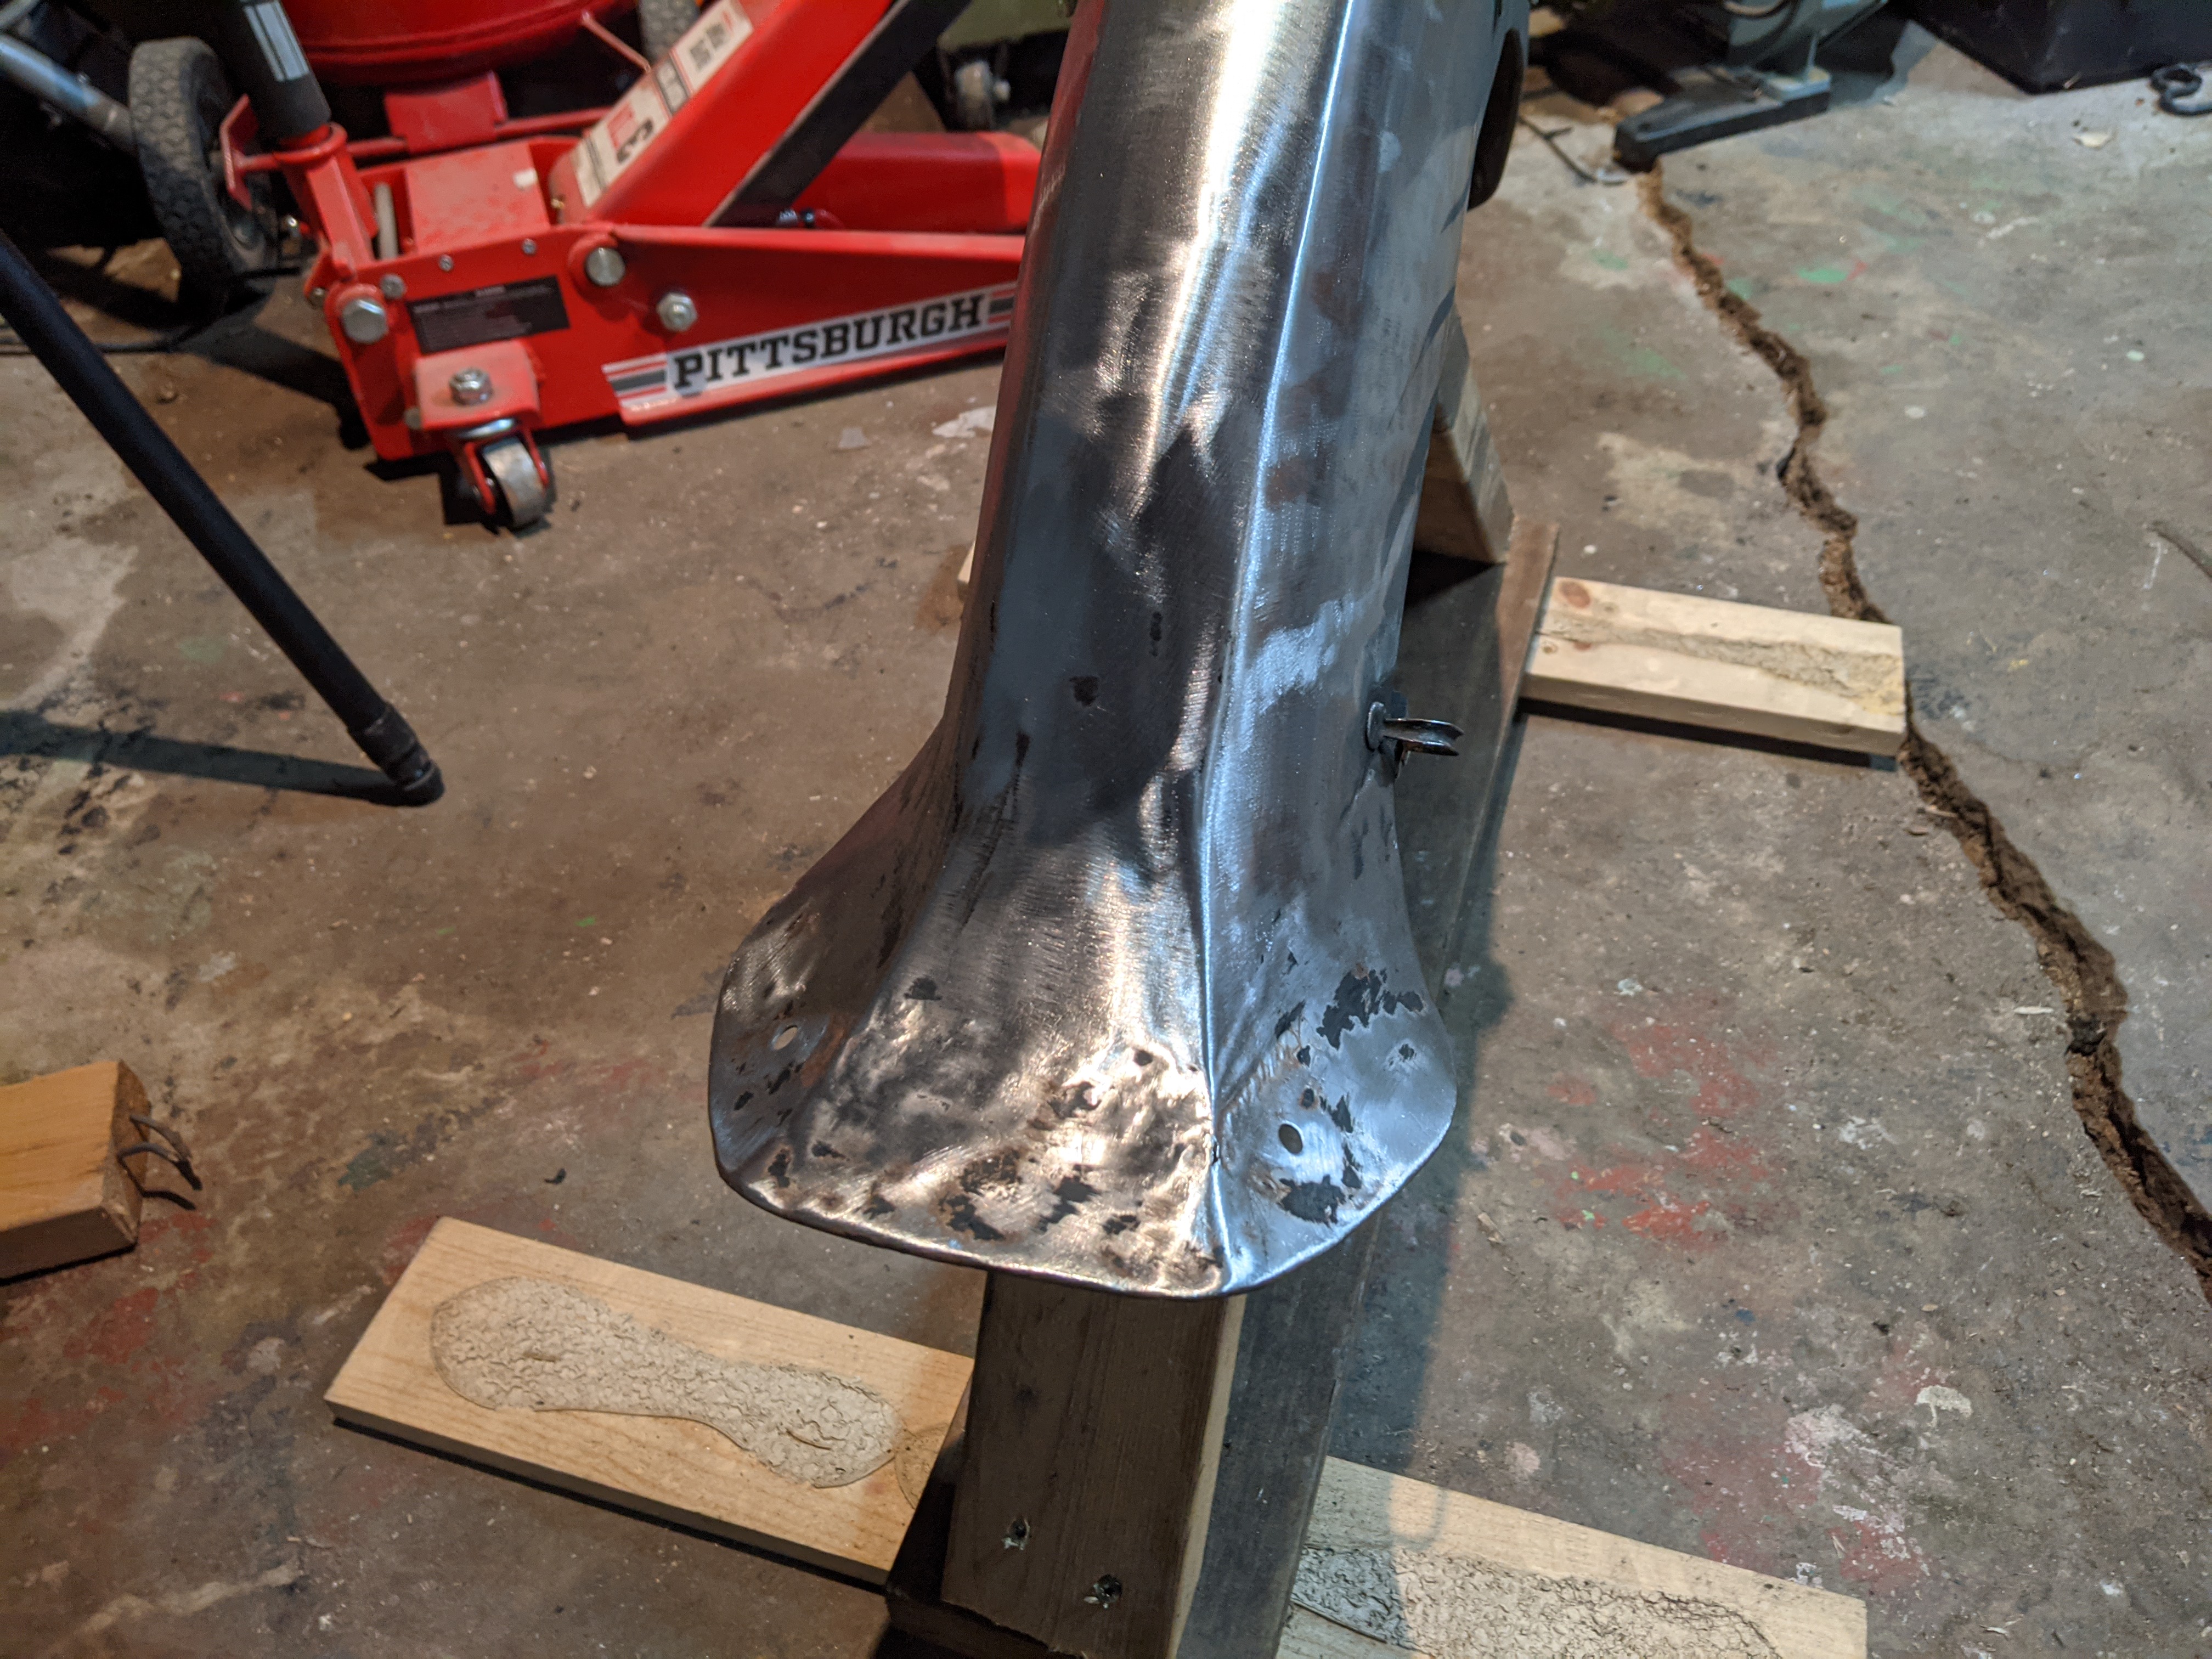
The front fender's "bell bottom" flair was badly mangled after a previous owner tried to ride if off of a tall curb or something.
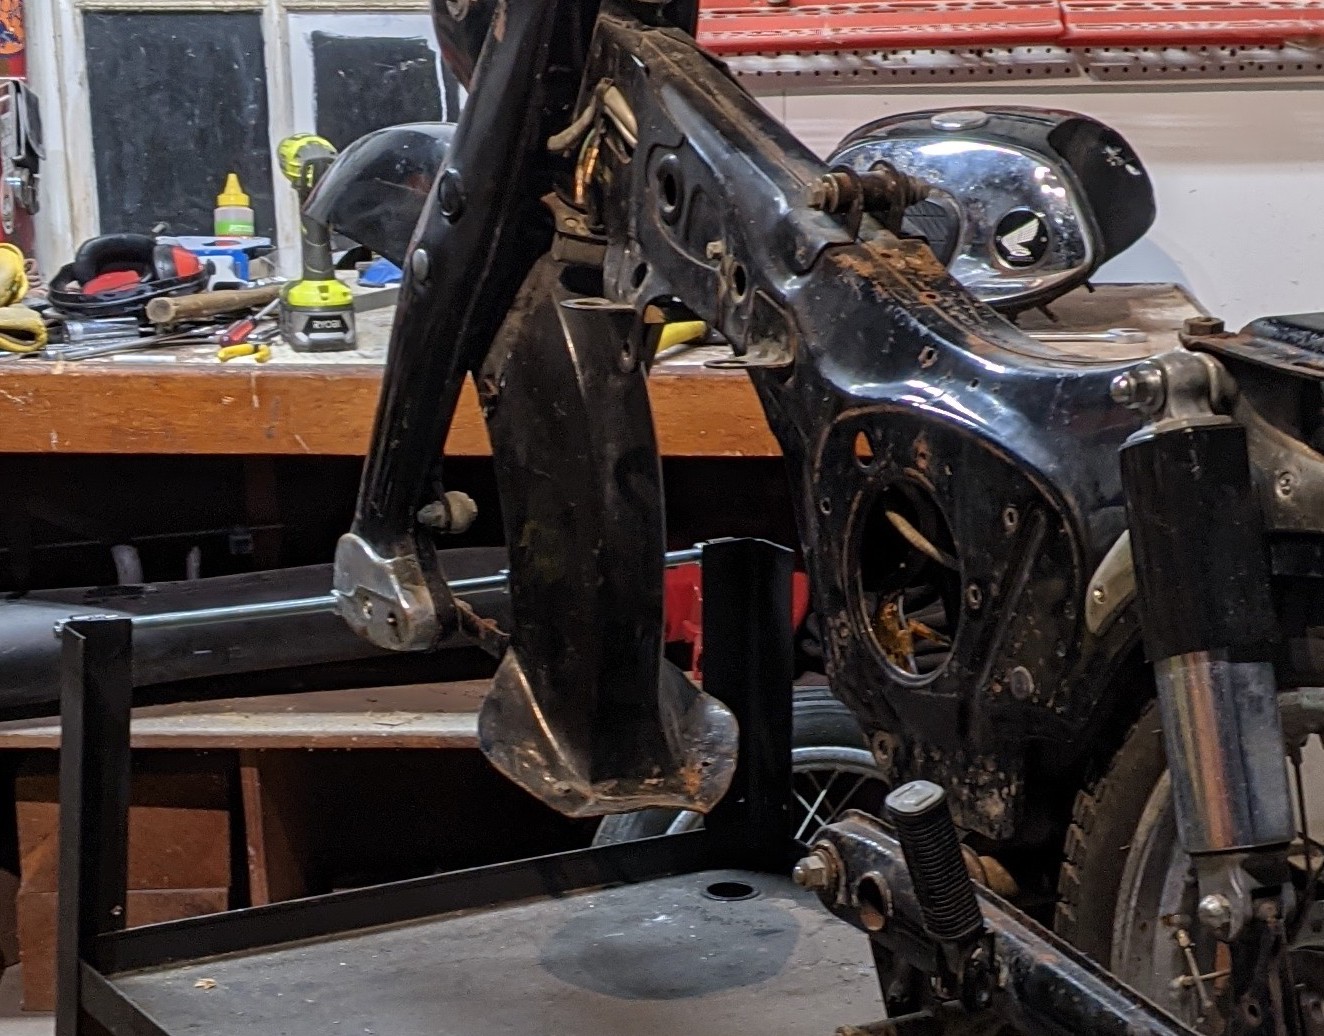
But I was able to get that mostly straightened out with a hammer and dolly. It will still need a good dose of bondo though.
Next I'll add the bondo to where it is needed, sand it smooth, fill the pin holes, then etching primer, then sanding/filling primer, sand it flat and smooth again, then etching primer on any bare metal after all the sanding, then the color coat of paint, and then the clear coat. For this project I think I will pick up a cheap air gun from HF and order some 2k paint from Eastwood or something. Will be my first time painting anything other than with rattle cans!
But most of my time has been spent thinking about what size battery I need.
I said earlier that the lithium chemistry of the battery cell is like the type of fuel (Lithium Ion is to gasoline as Lithium Iron Phosphate is to diesel) and the size of the battery, measured in Amp Hours, is like the size of the gas tank. But there's one more part to the equation that doesn't really crossover into this metaphor: the discharge rate of the battery. Maybe it could be thought of as the fuel pressure?
The discharge rate is how much current (amps) the battery can provide - instantaneously, not over time which is the capacity (amp hours). This is how strong your battery pack is and will ultimately determine how well the bike can accelerate or go up hills. And there's two measurements: continuous discharge rate and burst discharge rate.
The larger the gas tank (battery capacity, in this metaphor) is, the higher the discharge rate is. Which is why this methaphor doesn't make sense. And Li-ion and LiFePO4 have very different discharge rates - Lithium Ion being better, especially as a ratio to weight and volume. Li-ion cells are more powerful yet smaller and lighter, however they don't last as long and are more expensive than LiFePO4.
But for now let's just focus on what discharge rate I need to achieve out of my battery pack.
What has already been decided is the motor size. It is rated for 4,000 watts continuous. At 72 volts, that is 55 amps (4000/72=55). So if I want my battery pack to be matched to the motor I selected, then I need a pack that can continuously discharge 55 amps.
(I'm trying to explain it in a way that makes sense to folks who have never built an e-bike, like myself, but I hope I'm not sounding like I know what I'm talking about too much! I'm not even getting into the motor controller rating, i.e. phase amps vs battery amps, which just boggles my mind, especially after reading this thread.)
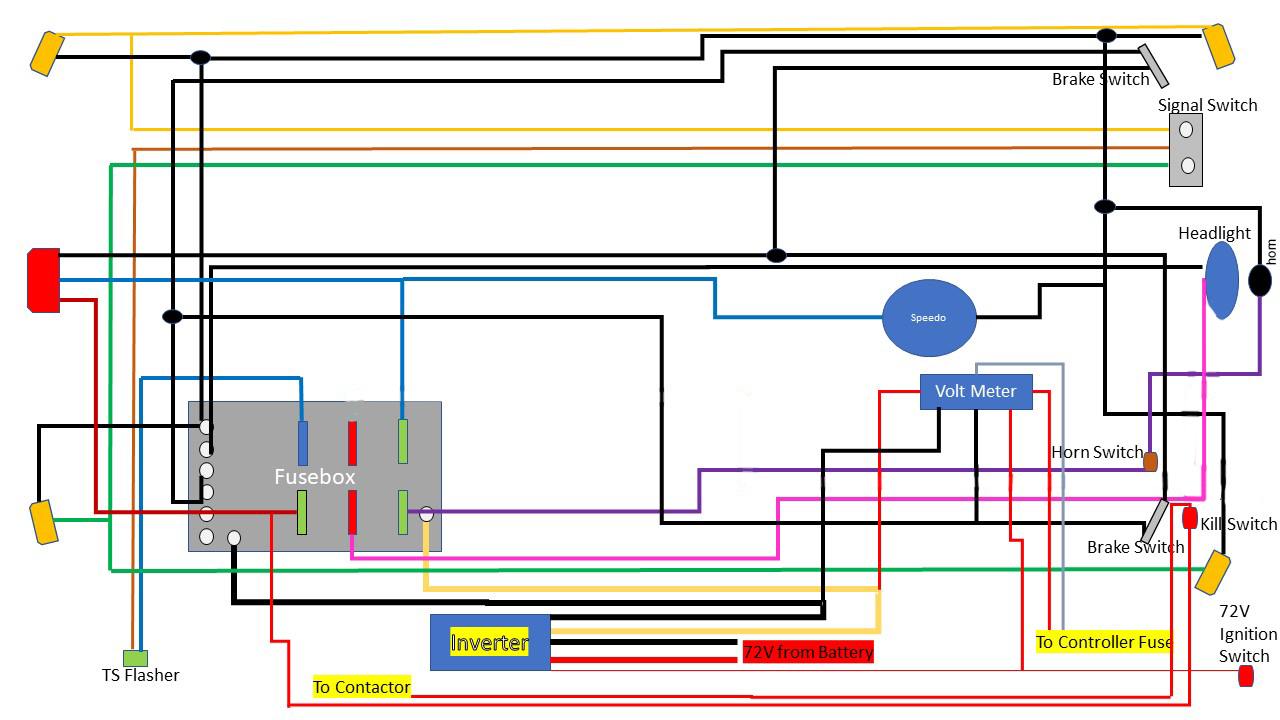
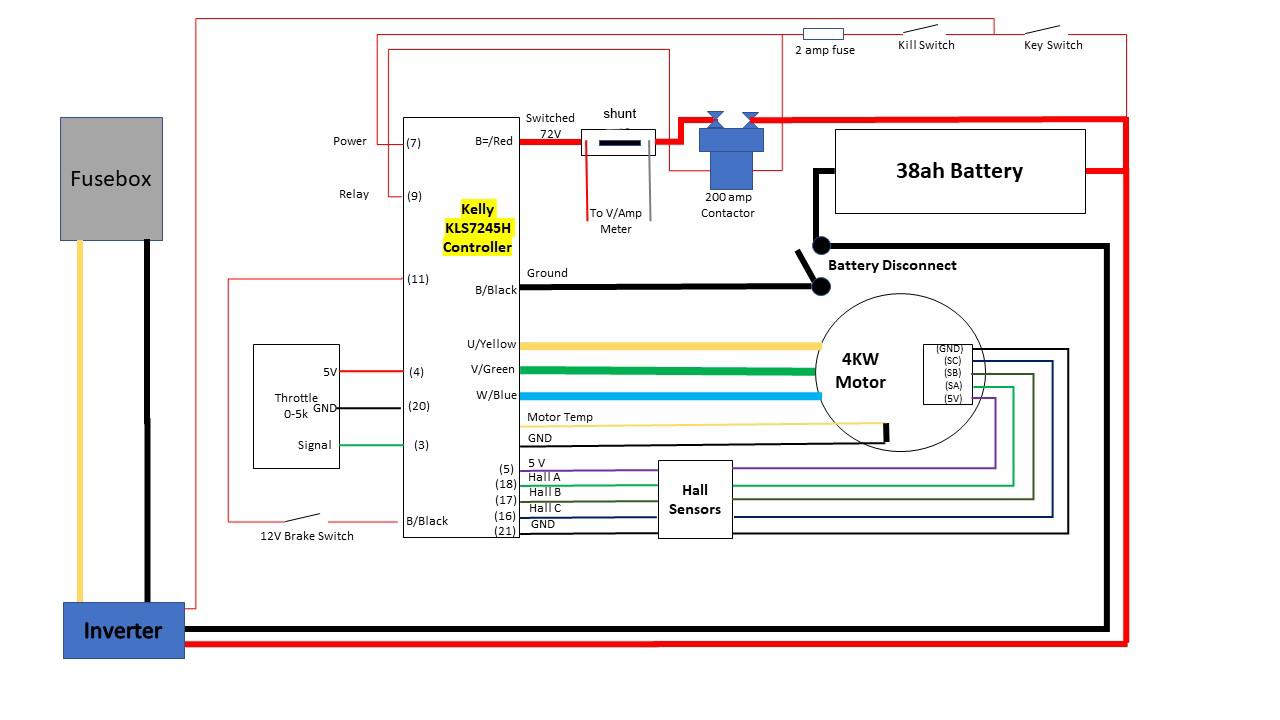
And I've also been planning the controls and the wiring harness.
I want the controls to be set up like a bicycle. Front brake on the left handlebar and rear brake on the right handlebar. The headlight will always be on (no high beam switch either). And the bike did not come with turn signals but I'm adding them for sure. Just need to find a turn signal switch I like.
I'll also need a keyed switch that will turn the bike on and off, and a kill switch that can quickly shut of the motor in case anything goes wrong. I also would like the brake switches to connect to the motor controller and tell it to not spin the motor if the brakes are engaged. Another safety feature. Actually, I think a feature of the motor controller that I ordered (Kelly KLS7245N) is regenerative braking and there's multiple modes to select from and, if I'm not mistaken, one of modes is to have regen only when the brakes are applied. That is what I would select.
For the headlight, the old sealed beam is 6v so that will not do. But it is a unique square shape so I will not be able to find a 12v LED replacement (I think). So my plan is to take it apart and retrofit a LED light of some sort inside of it. I found a tutorial on how to do this on the old forum of all places, but all the images are missing. Thankfully though the description is helpful enough that I should be able to figure it out.
Once I have all that figured out then I can start designing the wiring harness and then start actually building it. There will actually be two isolated wiring harness, one for the 12v system and one for the 72v system.
Here's some wiring harness examples, plagiarized from a guy building an EV classic Vespa scooter with the same motor and controller I'm using. There could be errors.
Here's an update to my photoshop mockup:
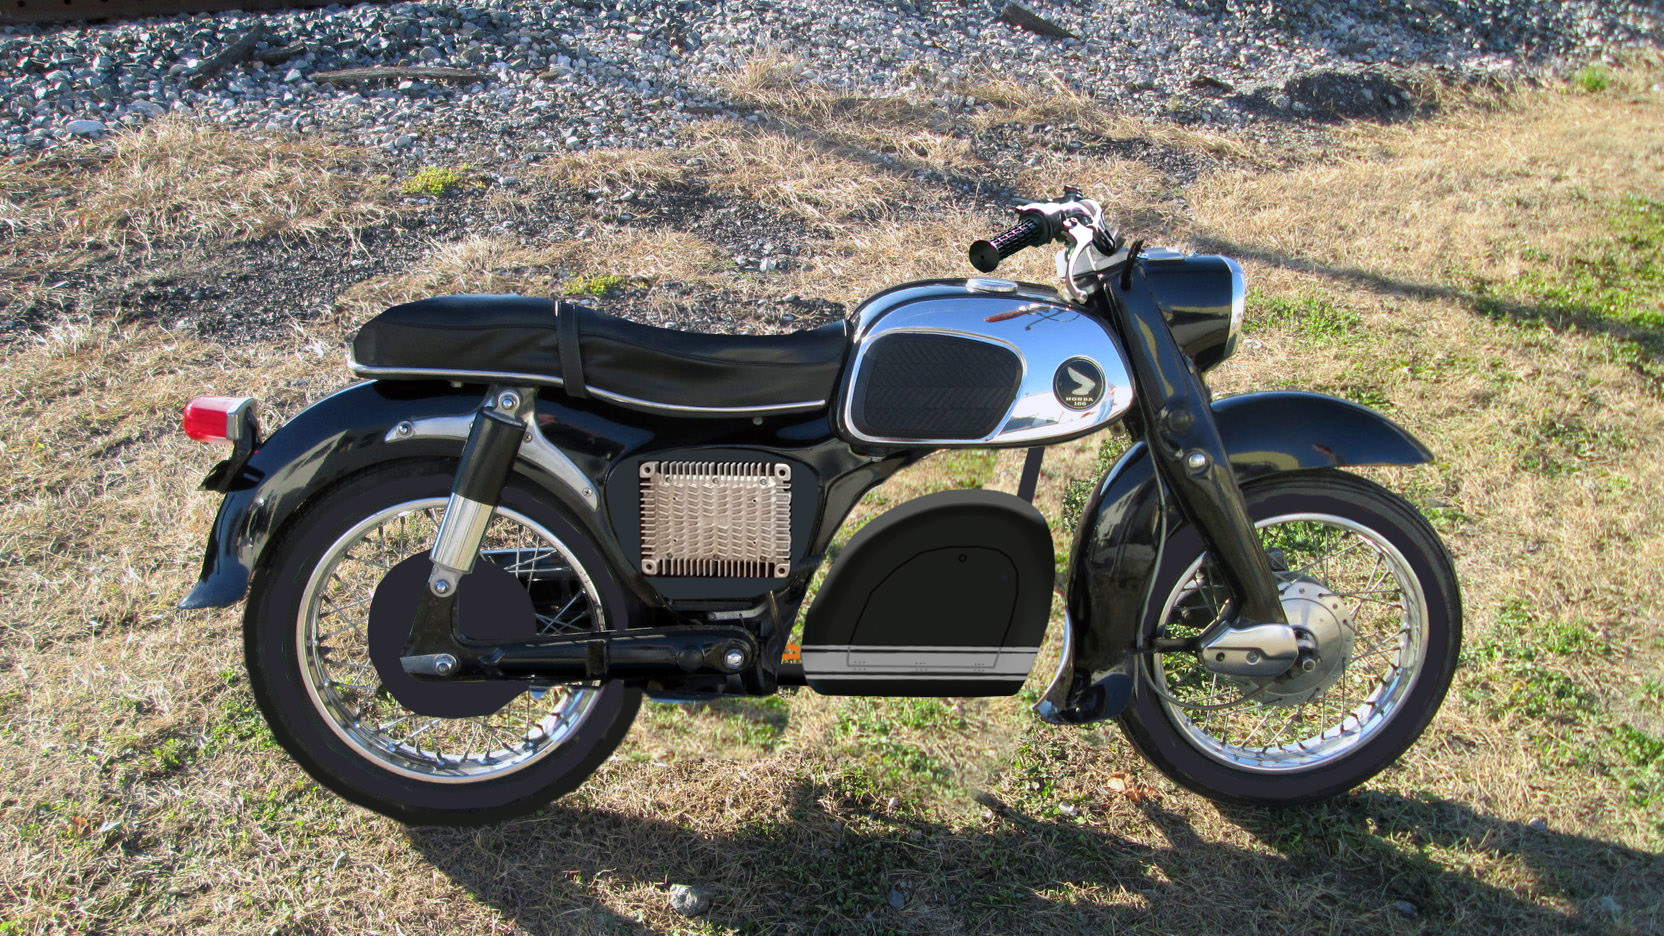
The battery box is designed to resemble a gas tank that has been stretched and distorted to fit the space, but still has that classic teardrop shape.
Next I did a little CAD (cardboard aided design) for the battery box. This will help me determine what dimensions that battery can be. But I will first build/purchase the battery pack and then I will build the battery box to exactly fit it. I plan on using 18ga steel sheet metal.
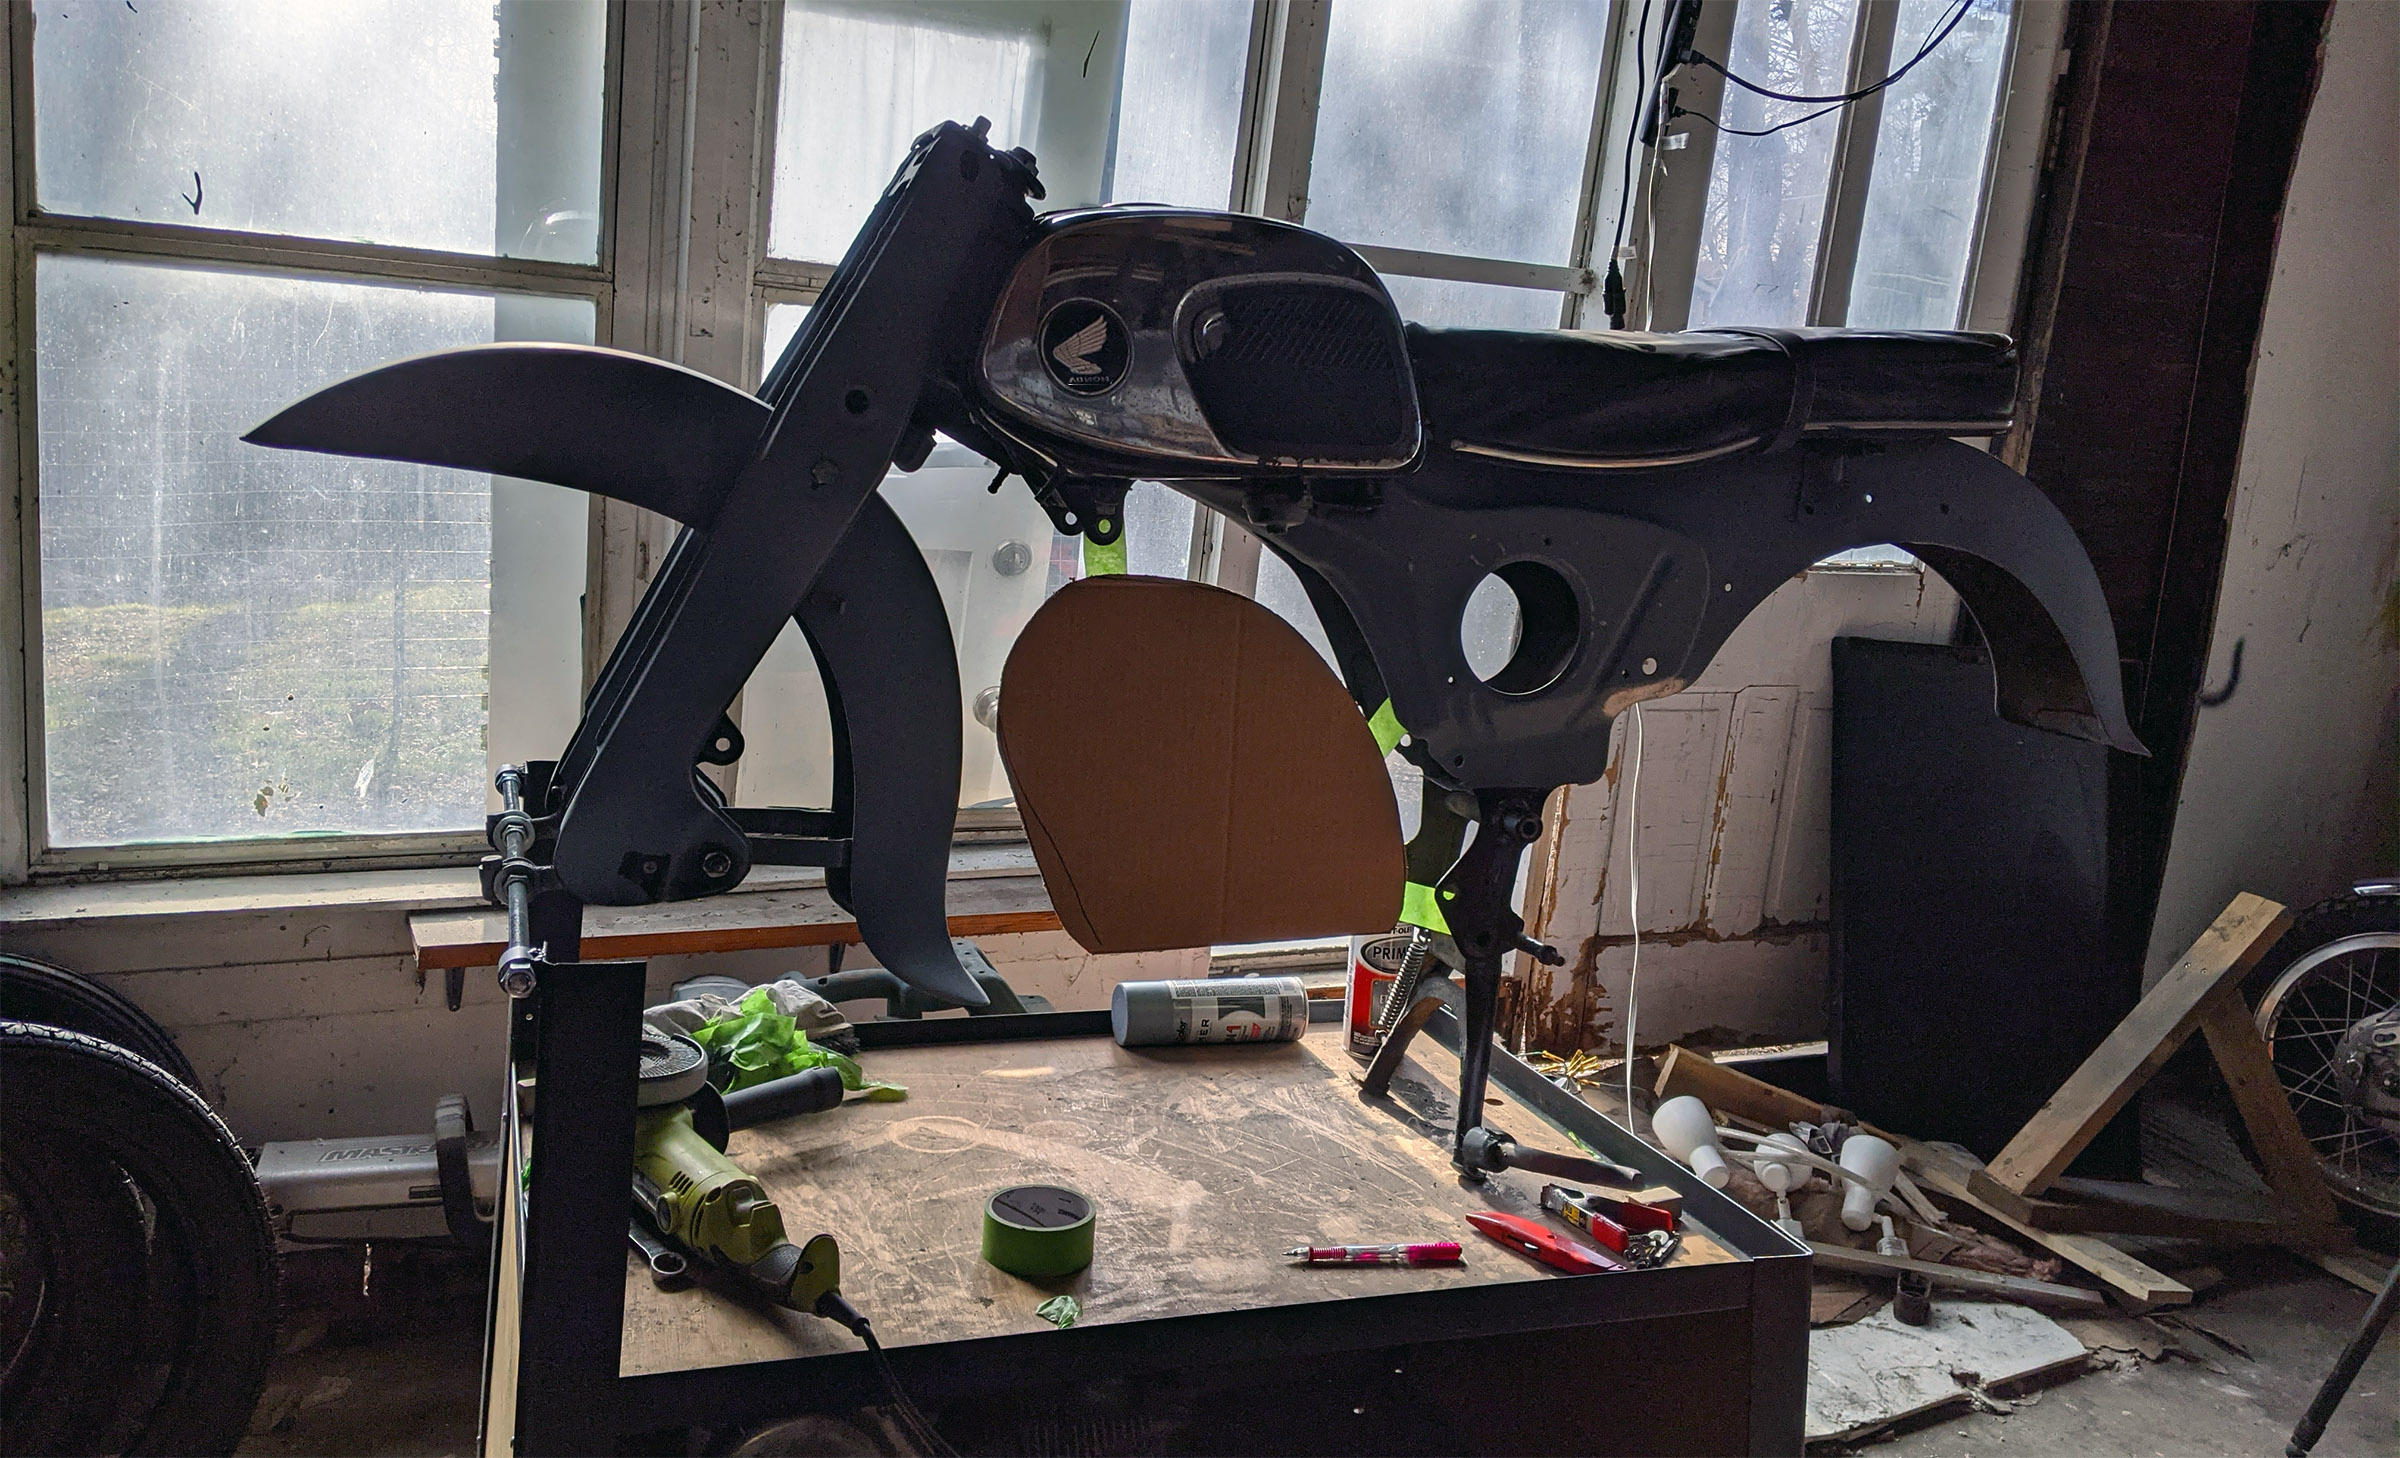
Now I have a life-size template of the side profile for the battery tank I want to build. But I can make the battery tank as wide as necessary to fit the battery pack.
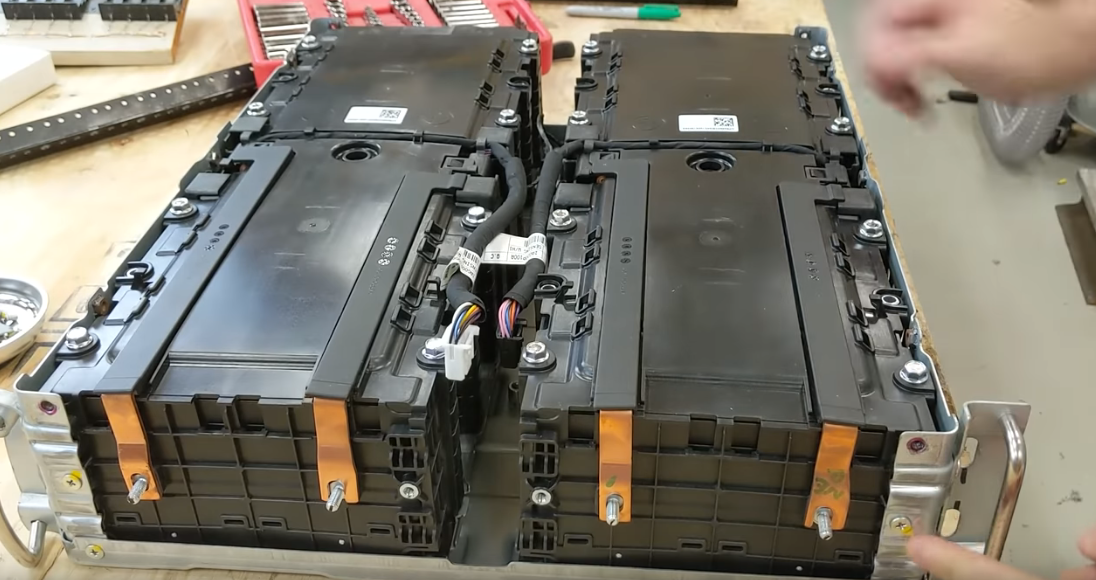
I'm still liking the used LG pouch cells on batteryhookup.com. Even at 2/3 capacity, if I re-configure them into 20s2p that would get me 20ah and 60amp continuous discharge. Just perfect because my 4kw motor can continuously pull 55amps max.
But they do not list the dimensions and I cannot find that information anywhere online. However for the rack mount units that these modules come out of, they say the dimensions are 22" deep and 17" wide. And they are oriented such that four cells fit in the footprint, so a quarter of that space is 11" x 8" (accounting for the 1" of space between the cells").
That gives me the footprint of the cells but not the height.
If I'm not mistaken, these are the same cells used in Chevy Volt battery modules. And from https://endless-sphere.com/forums/vi...p?f=14&t=62445 :
The module dimensions are 11" high and 9.5" wide, and a naked pouch is 0.220-inch thick. (5.6mm)
But let's just round up from .22 inches to 10mm. Just to be safe.
With the odd shape of my battery tank design, the battery cells will probably need to be something other than a cube. So using my conservatively estimated LG pouch cell size of 11" x 8" x 10mm, here is my first try at fitting them all in:
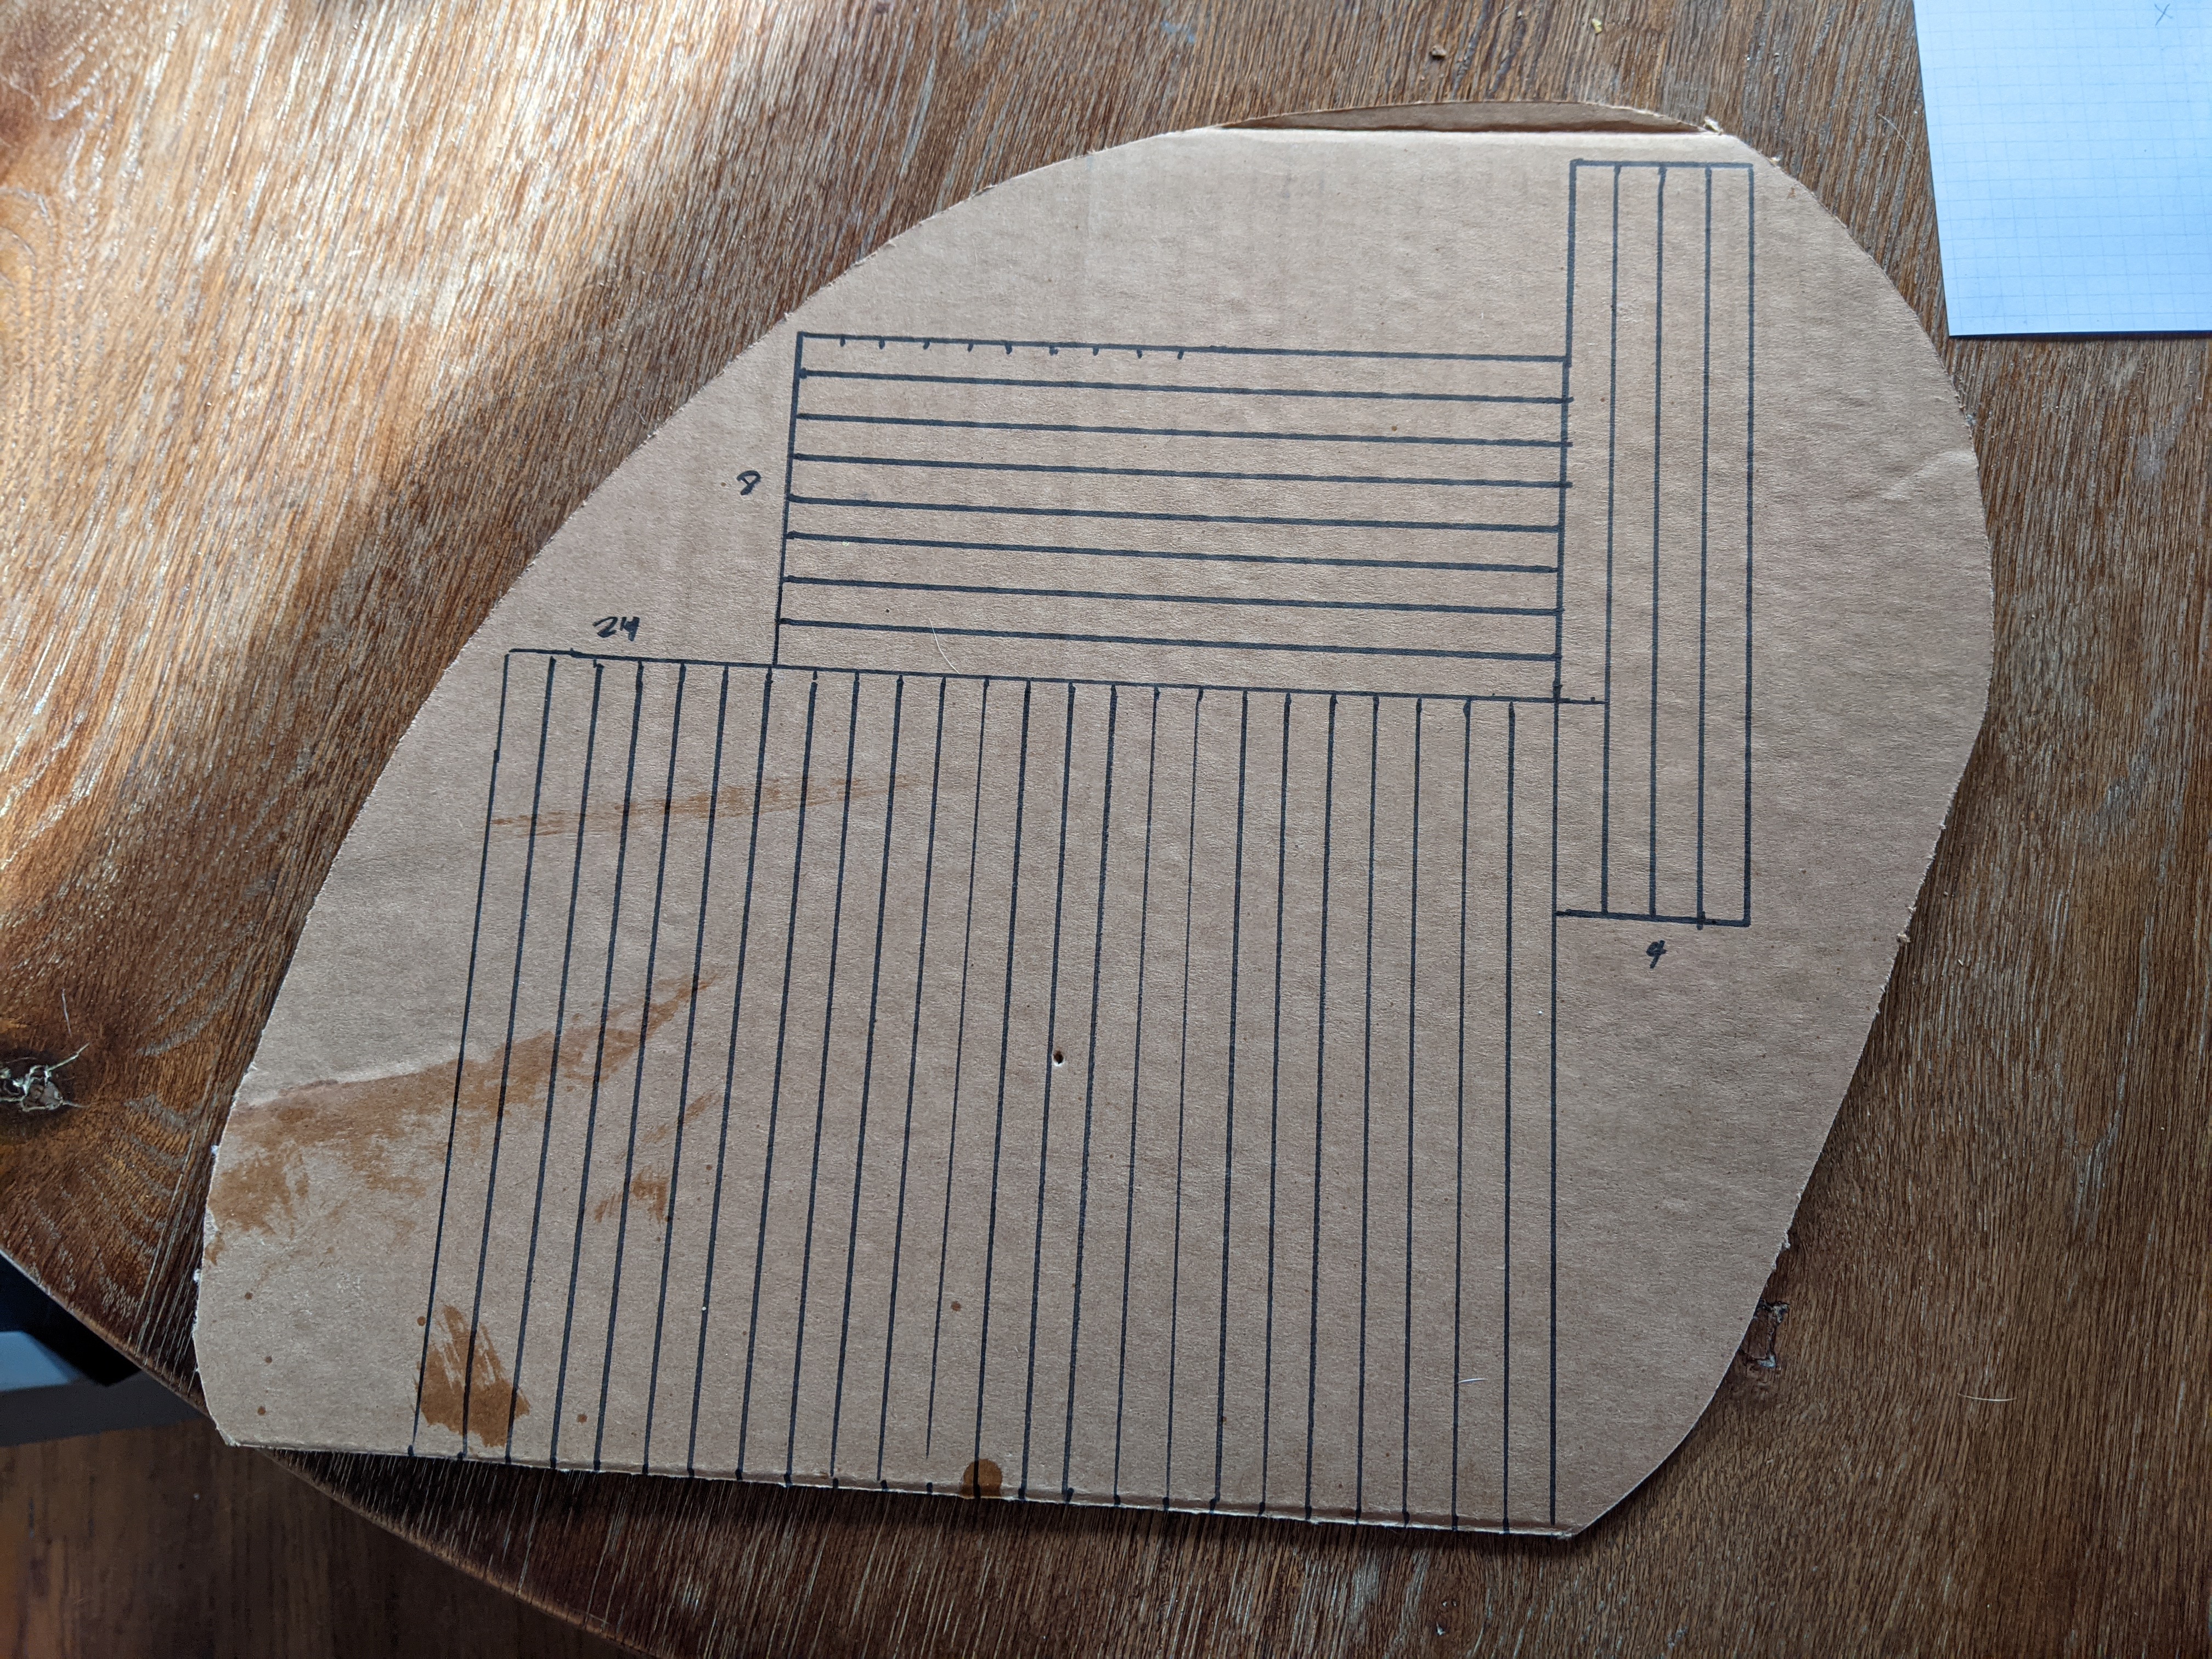
Only 26. I need to get 40 in there! 20s2p configuration.
Assuming it's fine to orient them on their sides, here's another attempt:
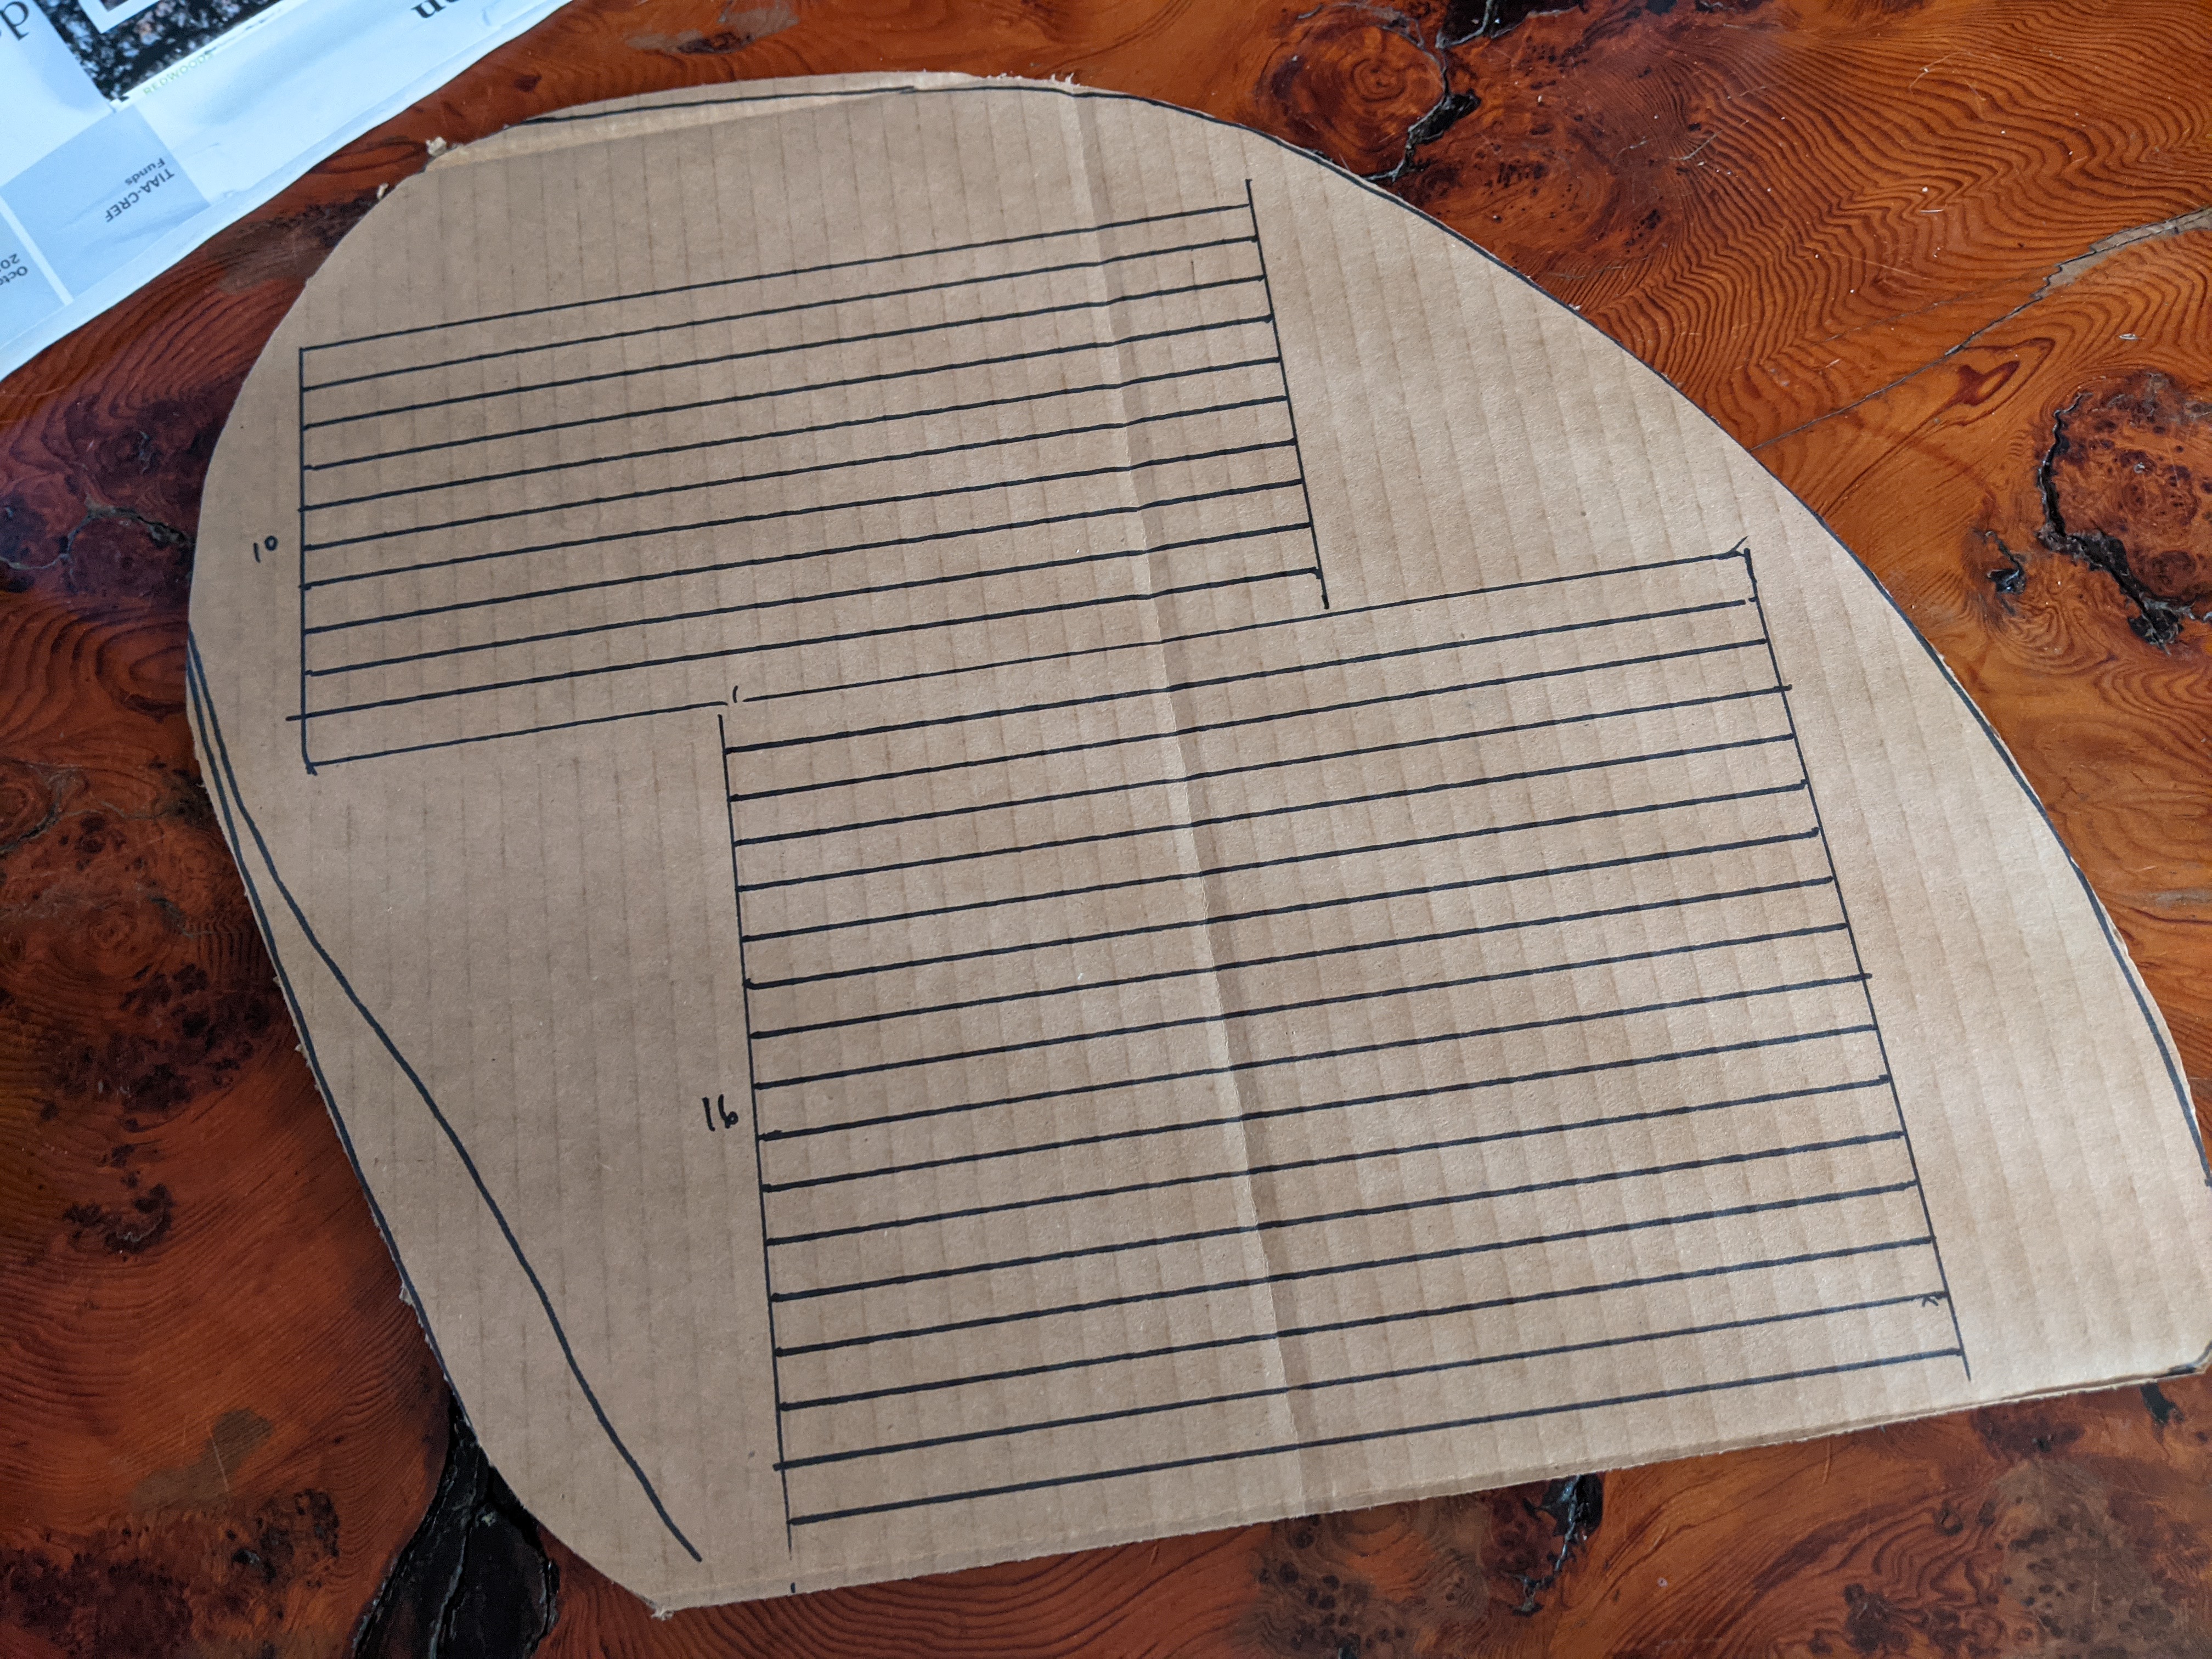
That's 36, but I think I could get 40 into that shape if I adjust here and there. Or if I've overestimated the size of the cells. If not then I can just make the "battery tank" a little bigger - I'll build the battery pack first and then build the tank to fit it. And if all else fails I can cut into the old gas tank and fit some cells in there.
So that's good enough for me.
I just ordered ten 4p modules from batteryhookup.com (plus one extra pack for backups). $200 + $50 for shipping. Not bad! You get what you pay for though, and I'm sacraficing quite a bit on lifespan, capacity, weight, and space. But I saved around $400 and I have the satisfaction of reusing and recycling.
I'll need to cut them in half into two 2p modules and wire 20 of them in series, but I think it will be not too hard. The pouches are already welded onto copper and aluminum bus bars, I'll need to cut those pieces in half, along with the plastic. It will be somewhat of an experiment and I haven't seen anybody else do it. Will be fun.
And let's calculate the estimated weight of the 40-cell pack: Batteryhookup.com says that the server rack unit which these 4p modules come out of is 85 pounds, and this youtuber shows it weighing in at 94 pounds on his scale, so let's just meet that in the middle at 90 pounds. And the server rack unit has a total of 56 cells (2 groups of 7s4p packs = 2 x 7 x 4 = 56). 90 pounds / 56 cells = 1.6 pounds per cell. I will have 40 cells so 40 x 1.6 = 64. So my pack could weigh around 64 pounds!
Just to do a little sanity check: I believe these are the same cells used in chevy volt battery packs, and this ebay listing for a chevy volt battery pack containing 32 cells is listed at weighing 49 pounds. 49 pounds / 32 cells = 1.5 pounds per cell. 40 cells x 1.5 pounds/cell = 60 pounds.
FYI I weighed the original gas engine (dry) around 80 pounds.
You might be wondering, how will I get the pack in and out of the battery tank? I will build it so that the bottom is a plate that can be unbolted.
For fabricating the tank itself, I plan on using 18ga sheet steel and I'll employ a variety of tools to get it into the compound shape I have in mind. I have a bead roller I will use to start the curvy bend, and I may need to shrink the metal around the top edge. I'll construct it from 4 pieces: the two sides, the top which will be curved but only in one direction, and the bottom which will be totally flat and will probably be something like 16ga or thicker. I'll weld all these together into a tank shape. And then I will either weld on tabs to bold it to the frame, or build a sub frame to cradle it and the sub frame will bolt to the frame.